Before I built the observatory I used to only use the laptop when I was going to try imaging. Now the laptop is almost always used unless I really am only doing visual astronomy and don’t want to bother with planetarium software, in which case the laptop and camera are a distraction to trying to glimpse the universe through Dublin’s light pollution. Here’s how I have things set up. This may not be ideal for you.
Connecting the Scope.
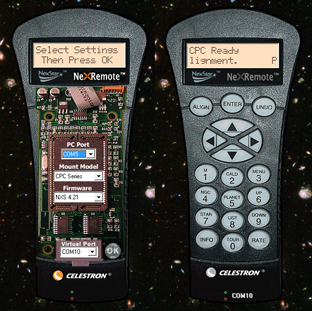
Celestron provide a NexRemote utility which give you a virtual hand controller on the laptop. On it’s own this is of limited use however it can also create a com port to allow other applications to send commands to the mount. NexRemote uses a serial port connector so you will need to get a serial<->usb adaptor that works for your Operating system to set this up. Windows8 does not support the range of adaptors that previous versions of Windows did so check that your OS is supported before you buy. Once with reputable chipsets are on ebay for under €15.
Once you have the scope connected it’s a good idea to check that you have the latest firmware for the mount and hand controller. This isn’t regularly updated by Celestron, but if you have never done it before you should.
When this is up and running you will have a replica of the hand controller on your screen. However it’s important to remember that this is not the same as the actual hand controller. For example you will need to perform an alignment using the laptop NexRemote not the actual hand controller.
ASCOM Dome Control
If you just want one other piece of software to talk to the mount then you don’t need to worry about ASCOM. Simply select the Celestron mount in your planetarium program and specify the virtual telescope port.
When you need to connect multiple pieces of software however you need to have something manage the different connections. Com ports are exclusive to the program that is connected to them so applications can’t just share a port. This is where ASCOM Dome Control comes in.
ASCOM provides and open language independent many-to-many architecture that will allow device manufacturers to write applications that will be able to interact with astronomy devices. Without it each application would need not only exclusive access to a device but also have code written specifically for each device-application combination.
Instead your application can choose to use an ascom device (and this is typical for most planetarium applications that can control the mount) and ASCOM will interface with the mount. Specifically it will interface with the virtual port that you selected in NexRemote.
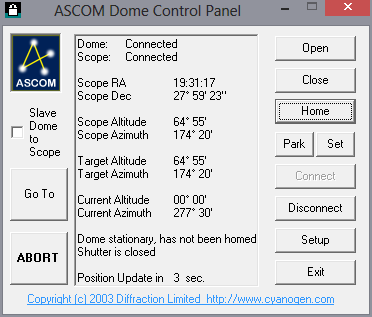
ASCOM Dome Control goes a step further in creating a hub that several applications can access. And since it is a standard piece of the architecture any applications that use ASCOM will also let you connect to the Dome Control.
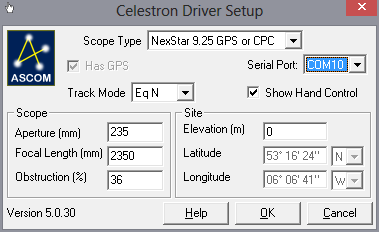
To configure this you fire up the Dome Control Application. Assuming you don’t actually have a dome you can select the simulator for the dome setup. For the scope setup you specify the virtual port that NexRemote is providing.
Lastly, for some reason I need to start Dome Control with Administrator privileges in Windows 8. And following on from that I need to start every application I want to use with it with administrator privileges. If anyone knows exactly why and how to get around it please let me know!
Planetarium software – The Sky X Pro
The first program you will want to hook up to your mount will be a planetarium program. I finally decided to splash out on a rather expensive piece of software – The SkyX Pro, however for years I had worked quite happily with the free Cartes du Ciel (and on Unix – XEphem).
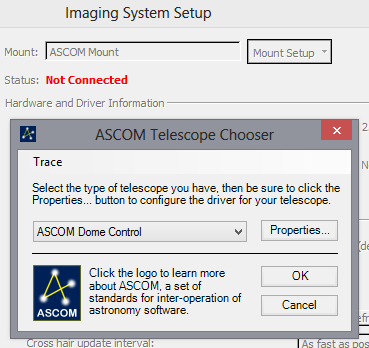
All of these will have an option to connect a telescope. You simply select the Ascom dome control from their list of scopes, and then select your scope from the dome control.
Depending on your software, you will have a marker on the sky map showing where the scope is pointed. You can then select another object and have the scope ‘slew’ to it. Most software will also let you make corrections so if you see you have a particular star through the eyepiece but the planetarium software shows the scope pointing somewhere else you can correct it.
Guiding software – PHD.
Guiding becomes an important tool for astrophotography if you are using long exposures and long focal lengths. Even more so with a mount like mine (wedge mounted CPC) which is far from an ideal long exposure accurate mount.
In my setup I have a 300mm refractor mounted onto the main scope with an ASI120mm camera attached. The basic idea is that this camera will monitor a star though the refractor and as it senses the star drift it will send an instruction to the scope to move the other way to keep it centred.
As part of this we need to give PHD access to the scope to make these corrections. And that’s achieved by selecting the dome control and the scope in a similar was as we did to the planetarium software. The key point being that the planetarium still also has control of the scope.
In addition to guiding you can use periodic error correction which can be programmed via a utility that Celestron also provide for free via NexRemote. Basically there is a slight wobble in the drive inherent to the mount design, however it is a repeated pattern over the cycle of the gear (15minues of so in the case of my scope). Assuming you have good polar alignment you can track a star’s movements over this period to determine this periodic error cycle. By taking several cycles and averaging them out a correction cycle can be produced an uploaded to the mount. The mount can then compensate for the periodic error. There are also commercial tools available to perform further analysis on the periodic error and producing models of it with Fourrier Transforms that, according to some reviews, provides almost total removal of periodic error.
Imaging Software – Backyard EOS
It’s also possible to connect BackyardEOS to the mount, but there is little benefit in doing so at present as there is no scope control within the application. It would be nice if the RA and Dec were saved in the filename or in the EXIF data, or even better save FITS files with the RA and Dec in the header.
However connecting BackyardEOS to PHD is worthwhile as this will enable dithering. Every detector has some bad pixels that will show up as very bright in the image. One way to reduce their impact when taking several subframes is to move the scope slightly so that the hot pixel will never be in the same place in our aligned image. BackyardEOS will instruct PHD to move the scope slightly when they are set up together.
That’s what the software setup in the observatory is like when using the DSLR. When doing planetary imaging all we really need is the NexRemote to adjust the pointing and the camera application for the ASI120mm (usually Firecapture).
My setup may change in future. For example I have not yet looked at AstroTortilla to do plate solving for me. Currently if I need to solve for pointing accuracy I will take a shot in BackyardEOS, do a quick conversion to FITS in Nebulosity then let TheSkyX solve it. I can then make any pointing corrections needed. I’ll certainly be giving AstroTortilla a go and if it makes life easier I’ll be using it 🙂