Astrometrica is a great piece of software to analyse images to search for and record the positions of objects. However getting it to work with a DSLR image can be a bit tricky. Here’s how I do it:
First take your image. Asteroids will change position over even a few minutes so you want to keep the exposure around 120s. You’ll also want to take darks and flats. I take images using Backyard EOS. You need to note the angle your camera is at, the simplest way is just to ensure it’s roughly parallel to the Declination axis.
Next we prepare the image for Astrometrica using Nebulosity. Perform the usual dark and flat processing but you will also need discard the colour data (Image->Discard Colour or Batch->One Shot->Generic RAW to L) and perform 2×2 binning (Batch->Geometry or Image->Bin) the images.
The binning is important as Astrometrica seems to have trouble otherwise as the stars take too up many pixels, and on most DSLR’s the pixel size is quite small. My 1000D has 5.7um pixels.
Now on to Astrometrica!
You need to get the settings right. Under Observing Site be sure to get the Longitude and Latitude. The CCD section is most important.
The focal length won’t be what’s in the telescope manual but that will be a good starting point. If you are using a focal reducer be sure to factor that in. The position angle here should be fine at 0 +/- 10 if you tried to get it roughly level while imaging.
Next get the CCD Chip details right. Canon 1000D has 5.7um pixels, but since we did a 2×2 bin the value needs to be 11.6um.
Here are the settings I have in the Program tab.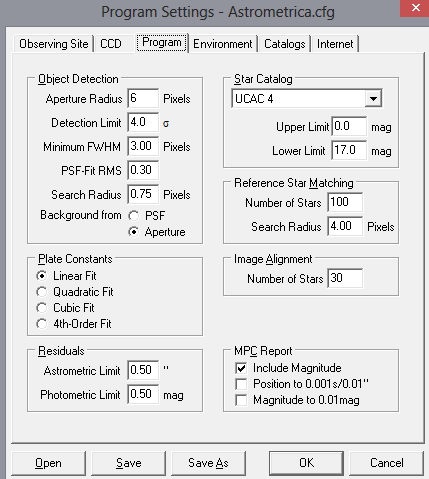 These are mostly the defaults but they seem to work best for me. What these settings determine is how a star is detected on the image. However since DSLR images are nosier than cooled CCD images hot pixels and noise can easily be picked up as stars, and that can interfere with solving and object detection.
When we load our image we need to provide the time and date it was taken. This needs to be in UT. And we need to list the mid time exposure. Calculating this from the Backyard EOS filename will be good enough. However BackyardEOS records the time in the filename from the time the file was written, this can be several seconds after the shutter closed so can be up to 10s off. I’ve mentioned this to the author and recording the actual shutter close/open time is on the feature request list.
Now hit ‘Astrometry->Data Reduction’. This will firstly ask you for the RA and Dec of the image. You should give this as accurately as you have it. Since you presumably know what you were imaging this shouldn’t be too hard!
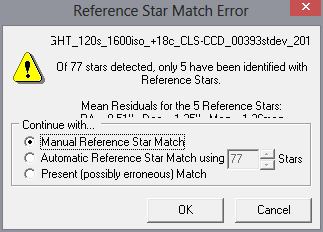
Ideally when you enter the RA and Dec the software will just work out a solution. That doesn’t often happen. Instead you get this screen, and you’ll want to select manual match.

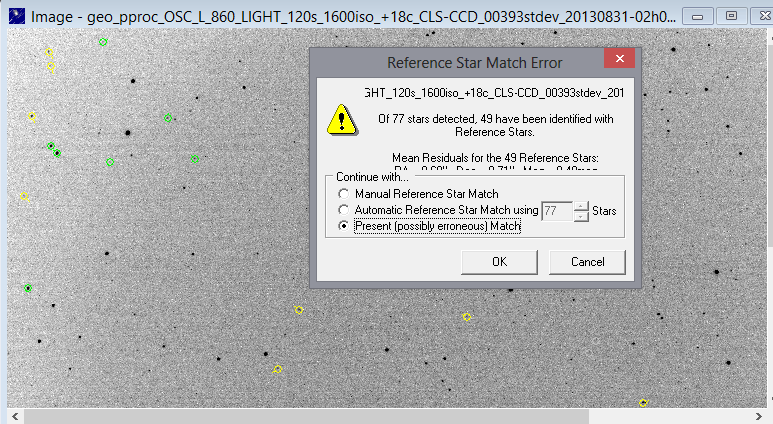
The red circles should roughly match the stars in the image. However you’ll need to change the focal length & rotation angle to get a good match. Note these values down as you’ll want to update these in the settings. After this we should have a better solution, it may not match automatically but if its close we can accept it. The green and yellow circles should be on clear stars in your image.
Now lets look for known objects and hope the asteroid we were looking for is there. Tools->Known Object Overlay. Taking your location, time, RA & Dec and the solved image the position of asteroids that should be in the image based on their orbital data will be displayed. Here’s the match we have for 860.
Next we click on the asteroid and we get the following screen: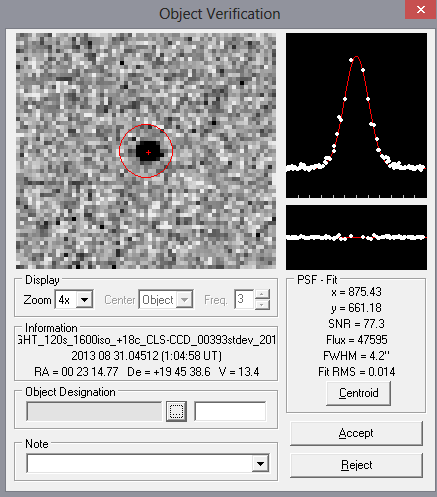
Here astrometrica is calculating the centerpoint of the lightsource and estimating the magnitude (the magnitude is a very rough estimate since we were using an uncalibrated and unfiltered DSLR). We can click on ‘Object Designation’ and Astrometrica will try and match it to the object it thinks it could be. Once we accept this a line will be entered in the MPC report file containing the time and location in an MPC submission format.
That’s it! It’s still more manual than I would like and I’m sure there are better settings to use for DSLR’s to have automatic solving work first time, so if you have a better experience I’d be very interested to see you detection settings.
I have tried your set up still cant get star field match…I match it perfectly manually and click OK and it goes back to showing on 4 stars match…what am I doing wrong?
Your help would be appreciated have spent 8 hours so far…no star field match
830 431 4017